Running out of disk space or needing to transfer large files on a Mac can be solved through file compression. Use the built-in utility in Finder to compress files by right-clicking on them and selecting ‘Compress.’ For advanced functions, third-party apps like Commander One, WinZip, and Keka offer more features. Additionally, you can reduce file sizes using built-in apps like Preview and QuickTime. Want more details? Check our next forum post for an in-depth tutorial on compressing files and managing file sizes on your Mac.
Hey everyone! ![]()
Running out of disk space or need to transfer big files? Compressing files on your Mac can save space and make it easier to send stuff. Plus, archives let you bundle multiple files or folders in one neat package, which is super handy for emails without hitting those annoying size limits.
First off, if you’re wondering how to compress files on a Mac, there’s a built-in tool that makes it a breeze. And if you’re looking for more advanced features, there are plenty of third-party apps out there. Let’s dive into some solutions and how to get it done via Finder! ![]()
How to Compress Files on Mac via Finder 
User’s Situation:
I’m trying to compress a file on my Mac to zip. I notice in Windows, you can right-click and compress to zip. That’s what I need on my Mac — Reddit
Before jumping into third-party apps, let’s talk about the built-in macOS utility that easily lets you zip or unzip files on Mac. Here’s the scoop:
Steps to Compress Files using Finder:
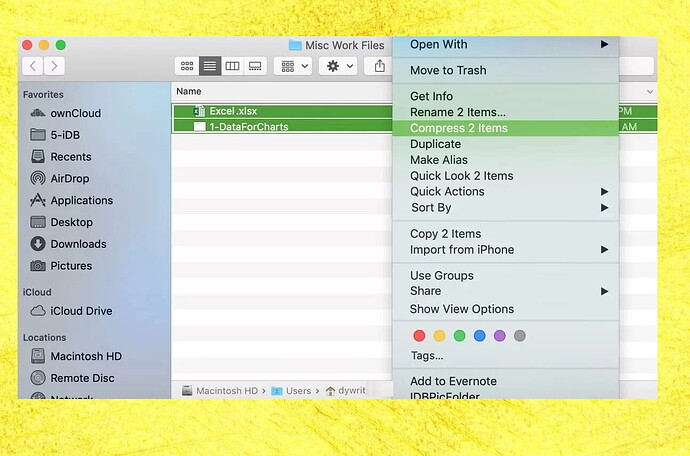
- Open Finder: Locate the file or folder you want to compress. To select multiple files, hold down the Command key and click on each file.
- Right-click the Selected Files: This brings up the context menu. Choose ‘Compress.’
- Let the Compression Begin: Your Mac will start compressing the files. This could take a few moments, depending on the size.
- Find Your Compressed File: Once done, the new compressed files will appear in the same folder as the originals.
If you compressed a single file/folder, it’ll have the same name but with a ‘.zip’ extension. For multiple files or folders, the archive will be named ‘Archive.zip.’ You can rename your .zip file, but keep the .zip extension intact.
Compress Files on Mac Using Third-Party Apps 
While the built-in tool is decent, its capabilities are limited, handling only Zip, CPIO, and CPGZ formats. For more advanced features, you might want to check out other options.
To step up your game, here are some third-party apps that Mac users can rely on. These tools support more formats and come packed with advanced features like encryption, cloud integration, and more.
Commander One 
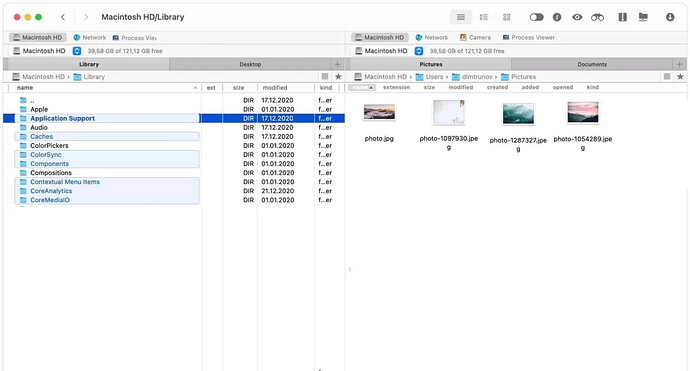
Let’s kick things off with Commander One. This beast of a file manager is not just for compression—it supports tons of formats like ZIP, TBZ, TGZ, and 7z, and lets you open archives as if they were regular folders.
Features:
- Custom Hotkeys

- Dual-pane Browsing for Easy Navigation

- File Operation Queue

- Supports Many Archive Formats:open_file_folder:

Downsides:
- Pro Features Require an Upgrade🛠️
How to Compress Files with Commander One:
- Select Files: Pick the files you want to compress and right-click.
- Choose ‘Compress Selected File(s)’

- Voilà! The archive shows up in the same pane.
Hotkeys for the Pros:
- Ctrl + F5: Compress files
- Ctrl + Alt + F5: Compress with options
Platform: macOS, Windows
Price: Free, Pro version costs $29.99
Download: Commander One
WinZip
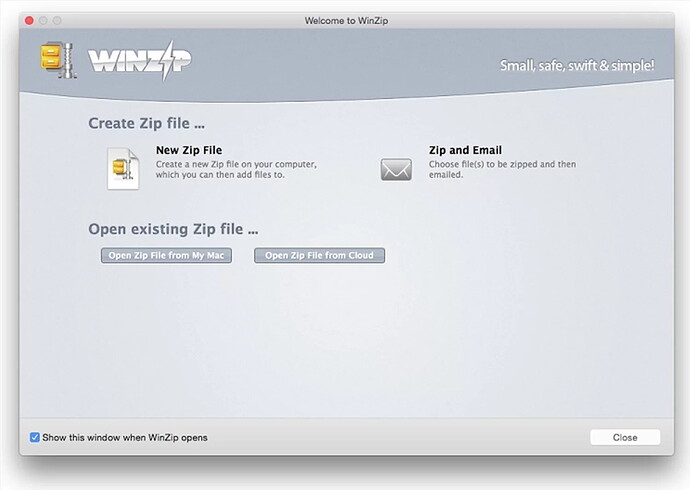
WinZip is another versatile option. Despite its name, it’s not just for Windows—it works on macOS, iOS, and Android too. Plus, it integrates with cloud services like Dropbox, Google Drive, and OneDrive.
Features:
- Supports Many Archive Formats

- Compress and Decompress Capability✨
Pros 
So, there’s this really cool feature about this app—you can link it with your cloud storage, and it uses high encryption to keep your files safe. Talk about convenient and secure!
Cons 
Well, the downside is there’s no totally free version. Just a trial with some limitations, which kinda sucks if you’re on a budget.
How to Archive Files with WinZip 
- Install and open WinZip.
- Select the files you want to archive using the WinZip file panel.
- Click “Add to Zip” and save your new zip file. Easy-peasy!
Platforms: macOS, Windows, iOS, Android
Price: Free trial, then $29.95
Download: WinZip
Keka: Another Awesome Mac Compress App 
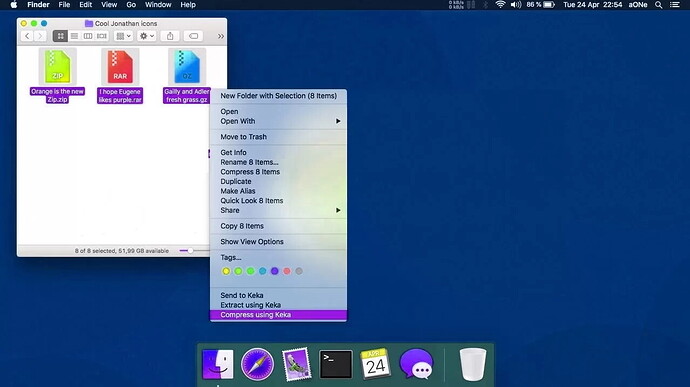
Keka’s another great option if you’re rocking a Mac. It’s designed specifically for macOS and can do all the usual archiver stuff. Plus, you can break up those big archives into smaller chunks, which is super useful for emailing.
Keka supports lots of formats—7z, Zip, Tar, and it can extract files from RAR, 7z, Zip, Tar, Gzip, etc. Just drag your files onto the Keka icon in the dock, and boom, you’re good to go.
Pros 
- Uses AES-256 encryption for top-notch security.
- Lightweight and super easy to use.
- Can split archives into parts.
- Handles a bunch of formats.
Cons 
- The latest version is still in beta, so expect a few bugs.
How to Use Keka for File Compression 
Getting started with Keka is a breeze:
- Open the app.
- Select your files and drag them onto the Keka window.
- File compression starts automatically.
You can even use hotkeys: Ctrl + Shift + C
Platform: macOS
Price: $4.99
Download: Keka
How to Make File Size Smaller on Mac 
Need to send files but they’re too big? No worries! Here are some methods to shrink those file sizes:
How to Make a Picture Smaller on Your Mac 
Using the Preview app, you can reduce any image size:
- Open the image in Preview.
- Click the Show Markup Toolbar icon.
- Click Adjust Size (or go to Tools → Adjust Size).
- Change Width and Height values as needed.
- Hit OK. Done!
How to Compress a PDF File on Mac 
Preview also works for PDFs:
- Open the PDF in Preview.
- Go to File → Export.
- Click on Quartz Filter and choose “Reduce File Size.”
- Save the file.
How to Make a Video File Smaller on Mac 
QuickTime is your friend for this:
- Open the video in QuickTime.
- Go to File → Export As and pick a resolution.
- Choose the location and hit Save.
How to Reduce a Document’s File Size in Pages 
Using the Pages app:
- Open the document in Pages.
- Go to File → Reduce File Size.
- Check both Scale down large images and Remove trimmed parts of movies and audio.
- Click Reduce This File or Reduce a Copy.
Conclusion 
Compressing files is a smart way to save space and make files easier to share. macOS has built-in tools, but for more features, third-party apps like Keka and WinZip are awesome choices. Now, you have all the info you need to choose the best tool for your needs. Happy compressing!![]()


